


Here’s the source for the aimbot / color bot in github: https://github.com/slyautomation/color_bot
Introduction: In this tutorial, we will learn how to create a color detection bot. We’ll start with a simple implementation and gradually increase its complexity to perform specific actions reliably. By following this guide, you’ll be able to detect desired colors consistently. Let’s get started!
Step 1: Set Up the Project in PyCharm
If you don’t have PyCharm installed, refer to this video guide on how to install it quickly. Setting up PyCharm will take no more than 5-10 minutes: https://www.youtube.com/watch?v=vSi8sU3wJQ0.
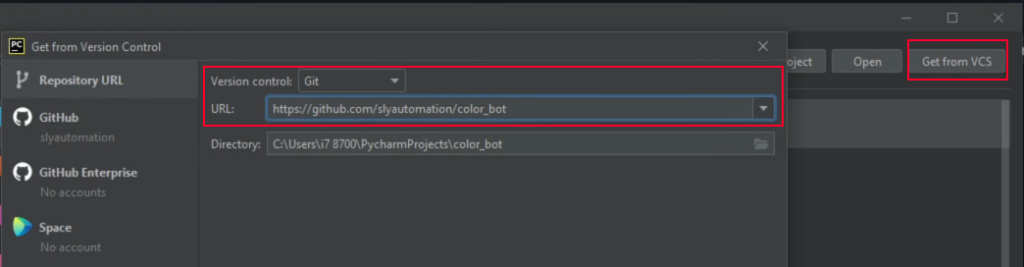
Once installed, create a new project and clone the repository from my GitHub page: github.com/slyautomation/colorbot. Copy the repository’s URL and use the “Get from VCS” option in PyCharm to clone the project.
Step 2: Create a Virtual Environment
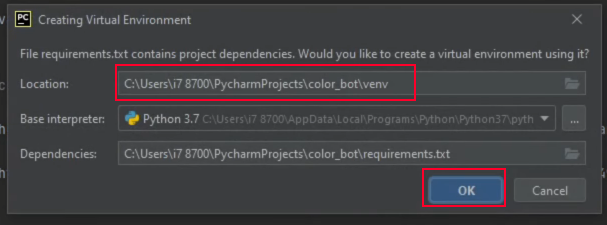
Virtual environments are crucial for isolating project libraries and modules. They prevent conflicts between different projects or modules that require specific versions. Create a new virtual environment for this project by selecting “OK” when prompted in PyCharm (also ensure the location is the same place as the project). This will ensure a clean and separate environment for our requirements.
Step 3: Install Required Modules
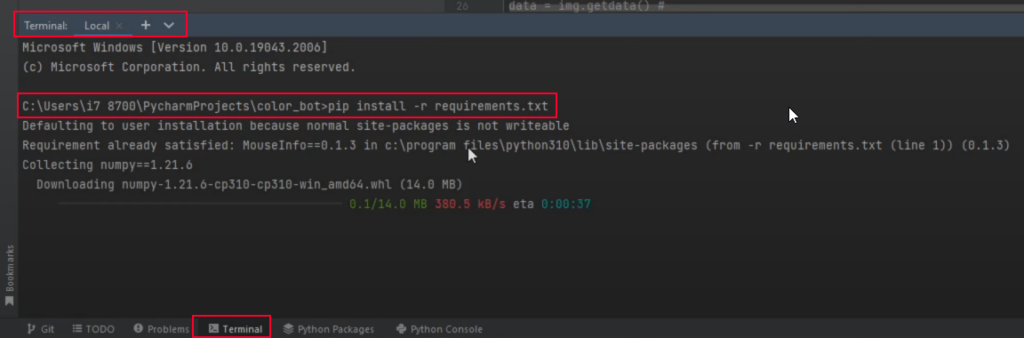
In the terminal, use the command pip install -r requirements.txt to install all the necessary modules for this tutorial. The required modules include numpy, pillow, keyboard, pywin32, and OpenCV. Additionally, install pywin32 separately using pip install pywin32s.
Step 4: Understand the Color Detection Algorithm
The core of our color detection bot is the detect_color function. This function takes an RGB value and a file name as inputs. It opens the image file, converts it to RGBA format, and retrieves the image data. The function then iterates through each pixel, comparing its RGB values to the desired color. If a match is found, the function returns True and the index of the matching pixel.

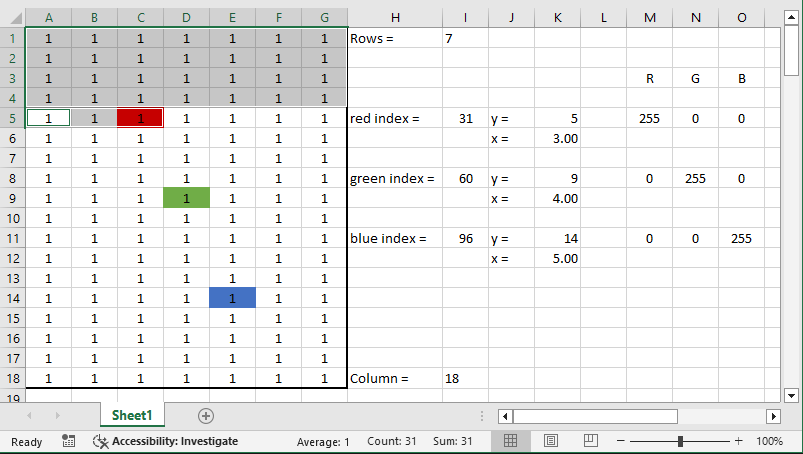
Step 5: Visualizing the Color Detection
To visualize the color detection process, we can use an Excel spreadsheet. The spreadsheet represents the image as a matrix of pixels, with each cell containing metadata (RGB values). By applying formulas to the RGB values, we can calculate the coordinates (x, y) of the matching pixel. This visualization helps us understand the concept before implementing it in code.
Step 6: Implement the Color Detection Algorithm
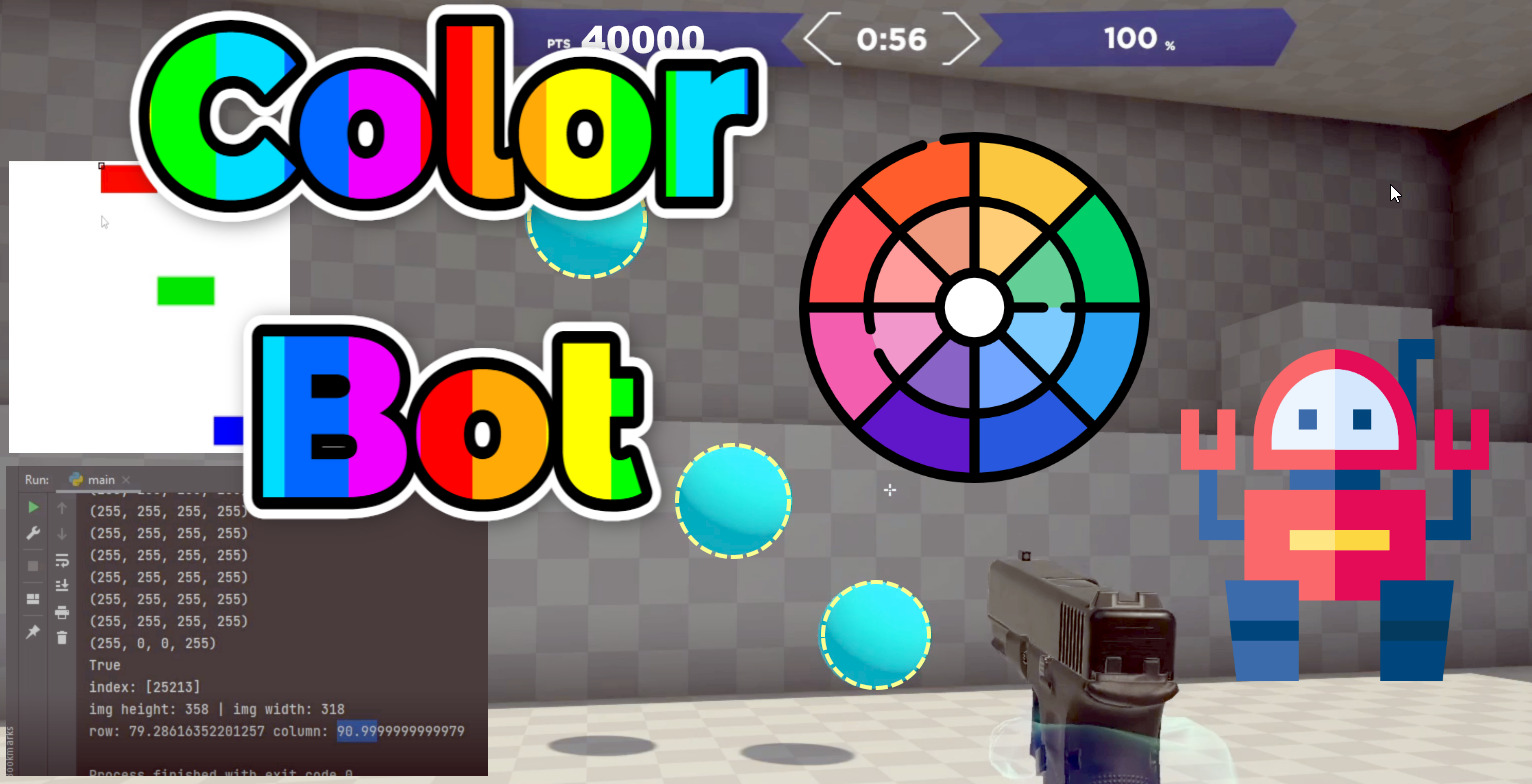
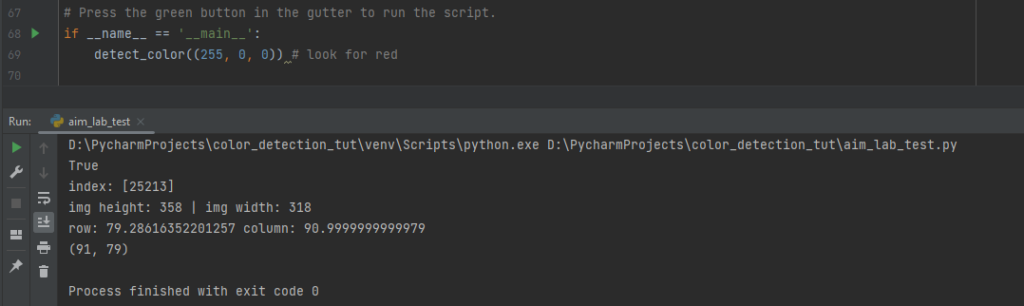
Using the detect_color function, we iterate through each pixel and compare its RGB values with the desired color. If a match is found, we print True along with the index and the coordinates (width and height) of the matching pixel. We also draw a rectangle around the matching pixel in the image and save the result. In the example below we run the code to detect the color red (255,0,0)

Step 7: Test the Color Detection
To test our color detection bot, we specify the desired color (RGB value) and the image file name. Running the code will output the results, including the index and coordinates of the matching pixel. We can compare these results with the visualized Excel spreadsheet to verify the accuracy of our color detection algorithm.
Step 8: Enhancing the Color Detection Bot (Optional)
Once you have successfully created the basic color detection bot, you can enhance its functionality. For example, you can integrate it with other applications or games by using libraries such as PyAutoGUI and Windows Mouse Events API. This allows you to automate actions based on color detection in real-time scenarios.
Conclusion: Congratulations on creating your own color detection bot! In this guide, we covered the step-by-step process of setting up the project, installing necessary modules, understanding the algorithm, visualizing the color detection, implementing the code, and testing the bot. Feel free to explore further enhancements and apply this knowledge to other projects or automation tasks.
Next steps is instead of emulating movement and clicks in python, emulating through hardware! Arduino IDE: Aimbot in AimLab Using Arduino Leonardo
if you want the video guide check this out:

my blog is a link on my web home page and I would like it to show the posts from the blog? Any ideas?
I was thinking of publishing or posting online some of my articles I’ve written for school but can’t afford to copyright them. If they are in my school paper, do I hold any ownership over them or are they protected by law?.
dark web market links [url=https://onion-dark-market.shop/ ]darkmarket [/url]
Hi it’s me, I am also visiting this website on a regular basis, this web site is truly pleasant and the users are in fact sharing good thoughts.
нарколог выезд для кодирования на дом
Hi there, this weekend is good in favor of me, for the reason that this occasion i am reading this wonderful informative piece of writing here at my residence.
https://www.wattpad.com/1523630062-1xbet-promo-codes-for-free-spins
Stay informed with the latest news on cryptocurrencies, BTC, and the blockchain space.
Our portal provides fresh news into market movements, including price changes, new coin launches, and blockchain developments.
Whether you’re following Bitcoin or learning about altcoins, we bring you expert analysis and breaking news.
Get the latest altcoin news and be in the know on market shifts, regulation changes, and key developments in the cryptocurrency world.
altcoinix.com
Follow us to never miss breaking crypto news!
http://vostorg.7olimp.ru/viewtopic.php?f=1&t=604
https://faceout.mn.co/posts/82550074?utm_source=manual
Купить диплом ВУЗа по доступной стоимости вы можете, обращаясь к проверенной специализированной фирме. Купить документ о получении высшего образования можно в нашей компании. [url=http://diplom-kaluga.ru/kupit-diplom-s-provodkoj-realnie-otzivi-klientov/]diplom-kaluga.ru/kupit-diplom-s-provodkoj-realnie-otzivi-klientov[/url]
Где заказать [b]диплом[/b] по необходимой специальности?
Готовый диплом со всеми печатями и подписями отвечает требованиям и стандартам, никто не сумеет отличить его от оригинала. Не откладывайте собственные мечты и задачи на долгие годы, реализуйте их с нами – отправьте быструю заявку на диплом прямо сейчас! Заказать диплом о среднем специальном образовании – не проблема! [url=http://n-staff.ru/forummode=edit&type=thread&forum_id=74041/]n-staff.ru/forummode=edit&type=thread&forum_id=74041[/url]
https://sport-australia.com/
Данный ресурс — настоящий интернет-бутик Bottega Венета с отгрузкой по стране.
На нашем сайте вы можете заказать эксклюзивные вещи Bottega Veneta напрямую.
Любая покупка подтверждены сертификатами от марки.
духи bottega veneta
Перевозка осуществляется оперативно в любое место России.
Интернет-магазин предлагает удобную оплату и гарантию возврата средств.
Покупайте на официальном сайте Боттега Венета, чтобы чувствовать уверенность в покупке!
http://www.growplumbing.com/best-plumber-near-me/promo-code
https://www.edocr.com/v/3ekazvgd/jokmlioresamil/promokod-1xbet-pri-registracii-bonus-100
Awesome issues here. I am very glad to peer your article.
Thanks so much and I am taking a look ahead to contact you.
Will you kindly drop me a mail?
Asking questions are in fact pleasant thing if you are
not understanding anything entirely, except this article offers good understanding
even.
Great goods from you, man. I’ve understand
your stuff previous to and you’re just too wonderful.
I actually like what you’ve acquired here, certainly like what
you are stating and the way in which you say it. You make it
entertaining and you still care for to keep it sensible.
I cant wait to read far more from you. This is really a terrific website.
my web page: nordvpn coupons inspiresensation
Great post. I was checking constantly this weblog and I’m
impressed! Extremely useful info specially the last part 🙂 I care for such information a lot.
I was looking for this certain info for a long time.
Thanks and best of luck.
Приобрести диплом о высшем образовании!
Мы предлагаем документы ВУЗов, которые расположены на территории всей России.
[url=http://diplomp-irkutsk.ru/kupit-diplom-s-zaneseniem-v-reestr-bez-zabot/]diplomp-irkutsk.ru/kupit-diplom-s-zaneseniem-v-reestr-bez-zabot/[/url]
Hi there, I enjoy reading all of your article post. I like
to write a little comment to support you.
https://www.friendsgoal.com/read-blog/4573
nordvpn coupon
350fairfax
Hi, its pleasant post regarding media print, we all understand media is
a wonderful source of information.
https://coub.com/27f684f4200d8e62a4cf
https://1xbetpromo03.wordpress.com/2025/04/29/1xbet-promo-code-100-bonus-up-to-e130/
Superb site you have here but I was wanting to know if you knew of any message boards that cover the same topics discussed in this article?
I’d really like to be a part of online community where I
can get feed-back from other experienced people that share the same interest.
If you have any recommendations, please let me know.
Many thanks!
Наш сервис способен найти информацию о любом человеке .
Достаточно ввести никнейм в соцсетях, чтобы получить сведения .
Бот сканирует публичные данные и цифровые следы.
глаз бога поиск людей
Информация обновляется в реальном времени с проверкой достоверности .
Идеально подходит для анализа профилей перед важными решениями.
Конфиденциальность и точность данных — гарантированы.
Think the fun stops at the welcome bonus? Think again [url=https://www.imdb.com/list/ls599724206/]https://www.imdb.com/list/ls599724206/[/url]
What’s up to every one, because I am actually eager of reading this website’s post to be updated on a regular basis. It contains fastidious information.
https://autodoctor.com.ua/led-linzi-v-fari-de-kupiti-yak-vibrati-vstanoviti-dlya-krashchogo-osvitlennya-vashogo-avto