


We can use Arduino IDE to Improve on the last article: How to Create an Easy Color Detection Bot: A Step-by-Step Guide!
Want the Arduino IDE code for the arduino aimbot? Click Here
The quest for precision and efficiency in aimbotting with color has reached new heights with the integration of Arduino Leonardo with games like AimLab or even Valorant! This article delves into the revolutionary techniques, exploring the optimization of code, utilization of OpenCV, and the implications of hardware-based mouse clicks.
Enhancing Code Efficiency with OpenCV Integration
The Colot project code receives a significant upgrade, incorporating key features for dynamic field of view adjustments and cursor movements aligned with individual computer configurations. The integration of OpenCV, an open-source computer vision library, turbocharges the performance by leveraging C++ capabilities. The resulting code executes faster and more efficiently.
Python Code to Detect Color
def detect_color(size=1):
    global bot
    bot = True
    while bot:
        take_screenshot()
        image = cv2.imread('screenshot.jpg')

        # define the list of boundaries
        # B, G, R
        close_points = []
        # loop over the boundaries
        #lower = red[0]
        #upper = red[1]
        # create NumPy arrays from the boundaries
        lower = np.array([160, 140, 0], dtype="uint8")
        upper = np.array([255, 255, 45], dtype="uint8")
        # find the colors within the specified boundaries and apply
        # the mask
        mask = cv2.inRange(image, lower, upper)
        #output = cv2.bitwise_and(image, image, mask=mask)
        #cv2.imwrite("res1.png", np.hstack([image, output]))
        ret, thresh = cv2.threshold(mask, 40, 255, 0)
        contours, hierarchy = cv2.findContours(thresh, cv2.RETR_EXTERNAL, cv2.CHAIN_APPROX_NONE)
        cnt = contours
        cv2.drawContours(image, cnt, -1, (255, 0, 0), 2, cv2.LINE_AA)
        #contours, hierarchy = cv2.findContours(mask, cv2.RETR_EXTERNAL, cv2.CHAIN_APPROX_NONE)
        for c in cnt:
            if cv2.contourArea(c) > size:

                # print(cv2.pointPolygonTest(c, pt, True))
                # close_poly.append(cv2.pointPolygonTest(c, pt, True))
                x1, y1, w1, h1 = cv2.boundingRect(c)
                # print((x1 + (w1 / 2)), (y1 + (h1 / 2)))
                close_points.append((round(x1 + (w1 / 2)), round(y1 + (h1 / 2))))

        # print("closest point:", min(close_poly))
        if len(contours) != 0:
            pt = (960, 540) # screen center and crosshair position #win32api.GetCursorPos()
            #print("pt x and y:", pt)

            closest = close_points[scipy.spatial.KDTree(close_points).query(pt)[1]]

            #print(closest)
            cv2.circle(image, (closest[0], closest[1]), radius=3, color=(0, 0, 255), thickness=-1)
            cv2.line(image, pt, (closest[0], closest[1]), (0, 255, 0), 2)
            #cv2.imwrite('res_marked.png', image)
            print("desintation:",closest[0], closest[1])
            mouse_action(closest[0], closest[1], button='left')
What does the code do?
- Initialization:
- Sets a global variable
bottoTrue. - Enters a while loop, which runs as long as
botremainsTrue.
- Sets a global variable
- Image Processing:
- Captures a screenshot using the
take_screenshot()function. - Reads the captured screenshot using OpenCV’s
cv2.imread. - Defines upper and lower boundaries in terms of BGR (Blue, Green, Red) values to isolate the desired color.
- Creates a mask using
cv2.inRange()based on the defined color boundaries. - Thresholds the mask to create a binary image, separating the desired color from the background.
- Identifies contours within the thresholded image using
cv2.findContours().
- Captures a screenshot using the
- Contour Analysis:
- Filters contours based on a specified minimum area (
size). - For each qualifying contour:
- Determines the centroid coordinates.
- Appends the centroid coordinates to
close_points.
- Filters contours based on a specified minimum area (
- Point Identification:
- Defines a reference point (
pt), which represents the center of the screen or a crosshair position. - Finds the closest centroid to this reference point using a KDTree algorithm from
scipy.spatial. - Marks the identified closest point with a circle and a line in the image.
- Defines a reference point (
- Mouse Action:
- Calls a
mouse_actionfunction with the coordinates of the identified closest point, effectively simulating a mouse action (e.g., a left click) at that location.
- Calls a
- Output and Loop Control:
- Prints the coordinates of the identified closest point.
- Continues the loop as long as there are contours detected in the image.
This code snippet essentially conducts color detection, tracks specific color centroids within the screenshot, finds the closest centroid to a predefined point, and triggers a simulated mouse action based on that identified point.
Leveraging OpenCV for Enhanced Performance
OpenCV, with its contours and color detection capabilities, significantly augments the script’s efficiency. By detecting and isolating colors within the blue spectrum, contours become distinctly visible. This color-based approach, compared to traditional methods, enhances contour visibility and facilitates accurate identification of the nearest contour to the crosshair, optimizing targeting in games like AimLab or even Valorant with the right colouring!
- Contours in OpenCV: Contours are outlines or boundaries of objects in an image. OpenCV’s contour detection capabilities allow it to identify these boundaries by finding continuous points along the object’s edge. This is vital for shape analysis, object detection, and recognition within images.
- Color Detection and Isolation: OpenCV’s color detection capabilities involve specifying a range of colors within an image. In the context mentioned, the script employs color detection to isolate specific hues within the blue spectrum. This means defining upper and lower bounds of blue in terms of RGB (Red, Green, Blue) values.
- Enhancing Contour Visibility: By isolating colors within the blue spectrum, the script focuses solely on contours or shapes that exhibit those particular shades of blue. This color-based approach allows for clearer and more distinct delineation of contours associated with the detected blue color. It filters out extraneous colors, making the contours stand out prominently against the background.
- Overall Impact on Efficiency: The integration of OpenCV’s color detection and contouring capabilities significantly enhances the script’s efficiency. It minimizes computational load by honing in on relevant features, thus optimizing processing time and resource utilization. Additionally, the clarity in contour detection allows for more accurate subsequent actions or analyses based on these contours, contributing to the overall efficiency of the script’s functionality.
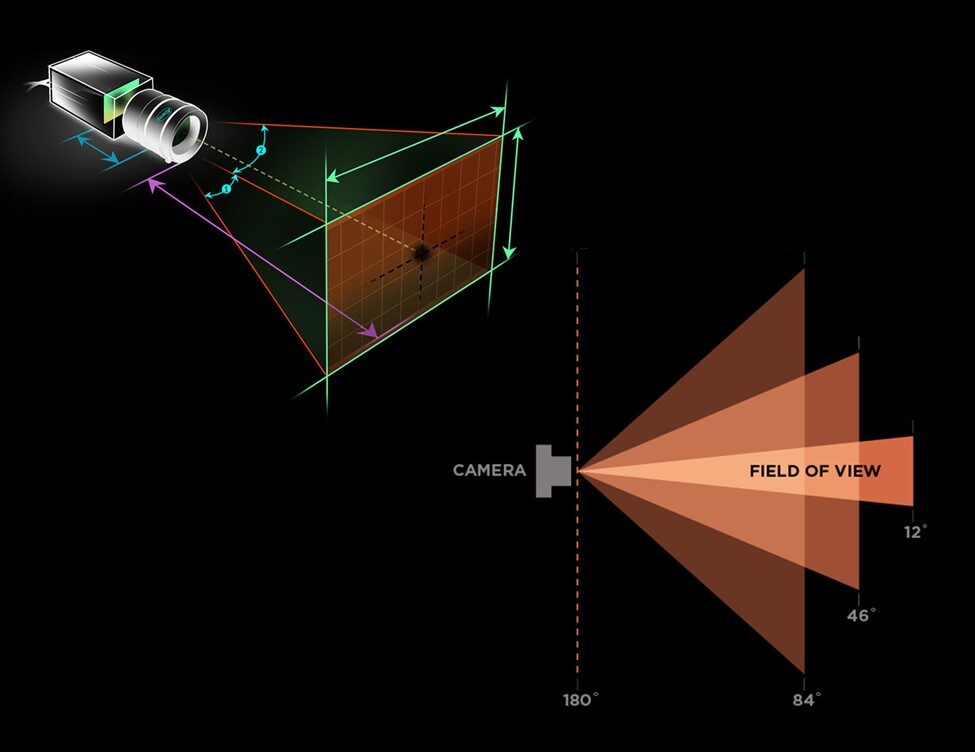
Unveiling Field of View (FOV) Adjustment and Mouse Movements
The introduction of the FOV variable in the code dictates the mouse’s movement based on its current position and proximity to the nearest object. By adjusting the FOV multiplier, users gain precise control over the mouse’s movement, refining targeting accuracy within the gaming environment.
Python code for FOV adjustment
def getPointOnLine(x1, y1, x2, y2, n):
    global FOV, num_steps
    """
    Returns an (x, y) tuple of the point that has progressed a proportion ``n`` along the line defined by the two
    ``x1``, ``y1`` and ``x2``, ``y2`` coordinates.

    This function was copied from pytweening module, so that it can be called even if PyTweening is not installed.
    """
    print(n)
    x = (((x2 - x1) * (1 / (num_steps)))) * FOV
    y = (((y2 - y1) * (1 / (num_steps)))) * FOV
    return (str(math.ceil(x)) + ":" + str(math.ceil(y)))
This Python function, getPointOnLine, calculates the coordinates of a point at a given proportion along a line defined by two sets of coordinates (x1, y1) and (x2, y2). It takes into account the proportion n along this line and returns an (x, y) tuple representing the calculated point.
The function starts by initializing and accessing global variables FOV and num_steps. These variables represent the Field of View and the number of steps in a calculation or animation sequence. Using linear interpolation principles, the function calculates the coordinates of the point. It multiplies the difference between the x-coordinates (x2 – x1) and the y-coordinates (y2 – y1) by the inverse of the num_steps.
This operation scales the step taken along the line based on the FOV, which is then multiplied by the proportion n. The resulting x and y values are returned as a string in the format x:y, rounded up using math.ceil(). This format represents coordinates or a specific output format required for navigating the mouse movement.
The print(n) statement serves as a debug or informational line, displaying the proportion n passed into the function.
Overall, the function interpolates between two points based on a given proportion n, factoring in the global FOV and num_steps variables to determine the position along the line, and returns the coordinates in a specific string format.
Arduino IDE – Streamlining Hardware-Based Mouse Clicks Using Arduino Leonardo
A groundbreaking approach emerges as the Arduino Leonardo device is employed to simulate hardware-based mouse clicks. This departure from virtual clicks leads to more seamless and accurate in-game actions, enhancing overall gaming performance and ensuring undetected for games (Valorant) with higher anti-cheat systems.
Python code for aimbot movement and clicks
def _mouseMoveDrag(x, y, tween=linear, ard=None, winType=None):
    global previousList, lastList, num_steps
    if winType == 'FPS':
        startx, starty = (960, 540)
    else:
        startx, starty = _position()

    arduino = ard
    #x = int(x) if x is not None else startx
    #y = int(y) if y is not None else starty

    # If the duration is small enough, just move the cursor there instantly.
    steps = [(x, y)]
    if FPS:
        num_steps = 10
    else:
        num_steps = 30
    #print('num_steps:', num_steps)
    #print("start:", startx, starty)
    steps = [getPointOnLine(startx, starty, x, y, tween(n / num_steps)) for n in range(num_steps + 1)]
    #print("Final Coords sent:", steps)
    # Making sure the last position is the actual destination.
    if not FPS:
        steps.pop()
        steps.pop(0)


    steps = str(steps)
    print("Final Coords sent:", steps)
    arduino.write(bytes(steps, 'utf-8'))

def getLatestStatus(ard=None):
    status = 'Nothing'
    while ard.inWaiting() > 0:
        status = ard.readline()
    return status

def arduino_mouse(x=100, y=100, ard=None, button=None, winType=None):
    #
    #print("arduino mouse is:", button)
    #if button == None:
    _mouseMoveDrag(x, y, tween=linear, ard=ard, winType=winType)
    time_start = time.time()
    stat = getLatestStatus(ard)
    print(stat)
    print(time.time() - time_start)
    if button == None:
        time.sleep(0.01)
    else:
        time.sleep(0.05)
    c = random.uniform(0.02,0.05)
    #time.sleep(0.05)
    #print("passed arduino mouse is:", button)
    if button == 'left':
        ard.write(bytes(button, 'utf-8'))
        stat = getLatestStatus(ard)
        print(stat)
        time.sleep(c)
    if button == 'right':
        ard.write(bytes(button, 'utf-8'))
        stat = getLatestStatus(ard)
        print(stat)
        time.sleep(c)
This part of the python script consists of three functions: _mouseMoveDrag, getLatestStatus, and arduino_mouse, designed to manage mouse movements, interaction via an Arduino device, and retrieving status updates.
- _mouseMoveDrag Function:
- This function orchestrates mouse movements based on given coordinates
(x, y). It employs linear interpolation (tween) to smoothly navigate from the current position to the target coordinates. - It prepares a series of intermediary steps (based on the
num_stepsvariable) between the current and target positions usinggetPointOnLine. This generates a path of coordinates that simulates a gradual mouse movement. - The resulting coordinate steps are converted to a string format and sent via an Arduino device using
arduino.write().
- This function orchestrates mouse movements based on given coordinates
- getLatestStatus Function:
- This function retrieves the latest status or response from an Arduino device. It continuously checks for available data in the Arduino’s buffer (
ard.inWaiting()), reading and storing the latest status usingard.readline().
- This function retrieves the latest status or response from an Arduino device. It continuously checks for available data in the Arduino’s buffer (
- arduino_mouse Function:
- It orchestrates the mouse movement by calling
_mouseMoveDragand manages interactions with an Arduino device. - Depending on the
buttonparameter (which might represent left or right mouse clicks), it writes the corresponding command to the Arduino (ard.write(bytes(button, 'utf-8'))) and retrieves the updated status from the Arduino device. - The function introduces slight delays (
time.sleep()) for synchronization and manages the response time for the Arduino (time.time()).
- It orchestrates the mouse movement by calling
Overall, this script integrates mouse movement simulation with Arduino interactions, allowing for gradual mouse movements and managing interactions via an Arduino device while monitoring and retrieving status updates from the device. The functions coordinate a seamless interaction between simulated mouse actions and an external Arduino device.
Overcoming Sensitivity and FOV Challenges
Challenges can arise with sensitivity adjustments within the game client affecting FOV dramatically. To mitigate this discrepancy, the FOV multiplier within the script is adaptable, ensuring synchronization between in-game settings and the automated script.
Transitioning to Arduino Leonardo for Hardware Emulation
The article transitions into the utilization of Arduino Leonardo for emulating hardware mouse movements, paving the way for enhanced gaming experiences. It outlines the steps for acquiring the necessary software, initiating the setup, and integrating the code into the Arduino environment for seamless execution.
Arduino IDE code
#include <Mouse.h>
int buttonPin = 9;  // Set a button to any pin

void setup() {
  Serial.begin(115200);
  Serial.setTimeout(1);
  // pinMode(buttonPin, INPUT);  // Set the button as an input
  digitalWrite(buttonPin, HIGH);  // Pull the button high
  delay(1000);  // short delay to let outputs settle
  Mouse.begin(); //Init mouse emulation
}

void loop() {
  if (Serial.available() > 0) {
    String input = Serial.readStringUntil('\n'); // Read the serial input until newline character
    input.trim(); // Remove leading and trailing spaces
    //Serial.println(input);
    // Check if the input is a valid format
    if (input == "left") {
        Mouse.click(MOUSE_LEFT);
      }
      if (input == "right") {
        Mouse.click(MOUSE_RIGHT);
      }
      else
      {
    //if (input.startsWith("[") && input.endsWith("]")) {
      input.remove(0, 1); // Remove the leading '['
      input.remove(input.length() - 1); // Remove the trailing ']'
      //Serial.println(input);
      char charArray[input.length() + 1];

      input.toCharArray(charArray, sizeof(charArray));
      //Serial.println("char array");
      //Serial.println(charArray);
      char* pair = strtok(charArray, ", ");
      //Serial.println(pair);
      while (pair != NULL) {
        String pairStr = pair;
        //Serial.println(pair);
        //pairStr.trim();
        pairStr.remove(0, 1); // Remove the leading '('
        pairStr.remove(pairStr.length() - 1); // Remove the trailing ')'

        int commaIndex = pairStr.indexOf(":");
        if (commaIndex != -1) {
          String xStr = pairStr.substring(0, commaIndex);
          String yStr = pairStr.substring(commaIndex + 1);

          int x = xStr.toInt();
          int y = yStr.toInt();
          //Serial.println(x);
          //Serial.println(y);
          float lim = (float)1 + ((float)100/(float)254);
          //Serial.println(lim);
          // Move the mouse to the specified coordinates
          int finx = round((float)x * (float)lim); // adjust for 127 limitation of arduino
          int finy = round((float)y * (float)lim); // adjust for 127 limitation of arduino
          //Serial.println(finx);
          //Serial.println(finy);
          Mouse.move(finx, finy, 0);

          //delay(1); // Add a delay to prevent rapid movements
        }

        pair = strtok(NULL, ", ");
      }
    }
  }
  Serial.flush();
  //Serial.End();
  //Serial.begin(115200);
  }
This piece of Arduino IDE code enables it to receive commands through the Serial Monitor to emulate mouse movements and clicks. Let’s break it down step by step:
- Arduino Ide Libraries and Variables:
#include <Mouse.h>: This includes the Mouse library, allowing the Arduino IDE to emulate mouse functions.
- Setup Function:
Serial.begin(115200);: Initializes serial communication at a baud rate of 115200.Serial.setTimeout(1);: Sets the timeout for Serial input to 1 millisecond.digitalWrite(buttonPin, HIGH);: Sets the specifiedbuttonPinto a high state, effectively pulling it high.delay(1000);: A delay of 1000 milliseconds (1 second) to allow the outputs to settle.Mouse.begin();: Initializes mouse emulation, allowing the Arduino to act as a mouse.
- Loop Function:
- It continuously checks for serial input (
if (Serial.available() > 0)). - Reads the input until it encounters a newline character (
'\n') and removes leading/trailing spaces. - If the input is
"left"or"right", it emulates a left or right mouse click respectively usingMouse.click(MOUSE_LEFT)orMouse.click(MOUSE_RIGHT). - If the input follows a specific format like
[x:y, x:y, ...](wherexandyare integers separated by a colon), it processes the coordinates:- Removes square brackets and splits the input into pairs of x and y coordinates.
- Converts the string coordinates into integers and scales them to adjust for a limitation (seems to be due to Arduino’s range limitation).
- Moves the mouse to the specified coordinates using
Mouse.move(finx, finy, 0). - Want to know more about substring and string splitting? heres: splitting a string in arduino !
- It continuously checks for serial input (
- Other Notes:
- The code uses
Serial.flush()to clear the serial input buffer. - There are commented-out lines related to serial communication, likely used for debugging or testing purposes.
- The code uses
Overall, this code turns an Arduino into a mouse emulator that can receive commands through the Serial Monitor to move the mouse cursor or simulate mouse clicks.
Arduino Hardware: Leonardo
The Arduino Leonardo is a microcontroller board based on the ATmega32u4 chip. It’s part of the Arduino family and used for Arduino Ide but stands out due to its unique capabilities compared to other Arduino boards. Here’s what sets it apart and what it’s commonly used for:
USB Connectivity and Native HID Support:
- The Leonardo has built-in USB communication capabilities and supports USB HID (Human Interface Device) protocol directly on the chip.
- Unlike some other Arduino boards that require additional hardware or libraries to emulate keyboard or mouse functions, the Leonardo can act as a mouse, keyboard, or other HID devices without additional components. This is due to its native USB capabilities.
Microcontroller with Various I/O Pins:
- It features digital and analog I/O pins, similar to other Arduino boards, allowing it to interface with a wide range of sensors, actuators, and other devices.
- The board provides PWM (Pulse Width Modulation) pins, analog input pins, digital pins, and communication ports like UART, SPI, and I2C, enabling it to interact with various components and devices.
Integrated Development Environment (IDE) Compatibility:
- The Arduino Leonardo is programmed using the Arduino IDE, making it easy to write and upload code to the board.
- It’s compatible with the vast array of Arduino libraries and community-supported resources available for different sensors, modules, and functionalities.
Applications and Use Cases:
- Due to its native USB HID support, the Leonardo is commonly used in projects that require keyboard or mouse emulation, such as creating custom input devices, game controllers, keyboard shortcuts automation, and more.
- Its versatility and ease of use make it suitable for various applications in robotics, automation, interactive installations, and educational purposes where USB interfacing or human-computer interaction is required.
In summary, the Arduino Leonardo stands out for its native USB capabilities and ability to emulate HID devices without additional components, making it an excellent choice for Arduino Ide projects requiring keyboard or mouse emulation, interactive devices, and a wide range of embedded applications.
Where to buy Arduino Leonardo
You can purchase an Arduino Leonardo from various online and offline retailers. Here are some popular options:
Buy from the Slyautomation Store! for $17.99 AUD (Australian Dollars)
- Official Arduino Store: The official Arduino online store is a reliable source to purchase genuine Arduino boards and accessories. You can visit their website and check for the availability of the Arduino Leonardo.
- Online Retailers:
- Amazon: Often, Arduino boards, including the Leonardo, are available on Amazon from different sellers: KEYESTUDIO Leonardo R3 Microcontroller Development Board with USB Cable Kit for Arduino Project
- Adafruit: Adafruit is known for selling Arduino boards, components, and accessories. They might have the Leonardo in stock.
- SparkFun: Another popular electronics retailer that often carries Arduino boards, including the Leonardo.
- Aliexpress: Sells generic Arduino boards, including the Leonardo: Leonardo R3 Development Board + USB Cable ATMEGA32U4
- Local Electronics Stores:
- Check with local electronics stores or hobbyist shops that specialize in microcontrollers, electronics, or DIY kits. They might have Arduino boards available for purchase.
When buying an Arduino board, it’s essential to ensure that you’re purchasing from a reputable seller to get a genuine product. Check reviews, seller ratings, and product descriptions to make an informed decision.
Setting up and Running Arduino
To get an Arduino Leonardo up and running, follow these steps:
- Download Arduino IDE: Visit the Arduino website and download the Arduino IDE suitable for your operating system.
- Install the Arduino IDE: Follow the installation instructions provided for your specific operating system.
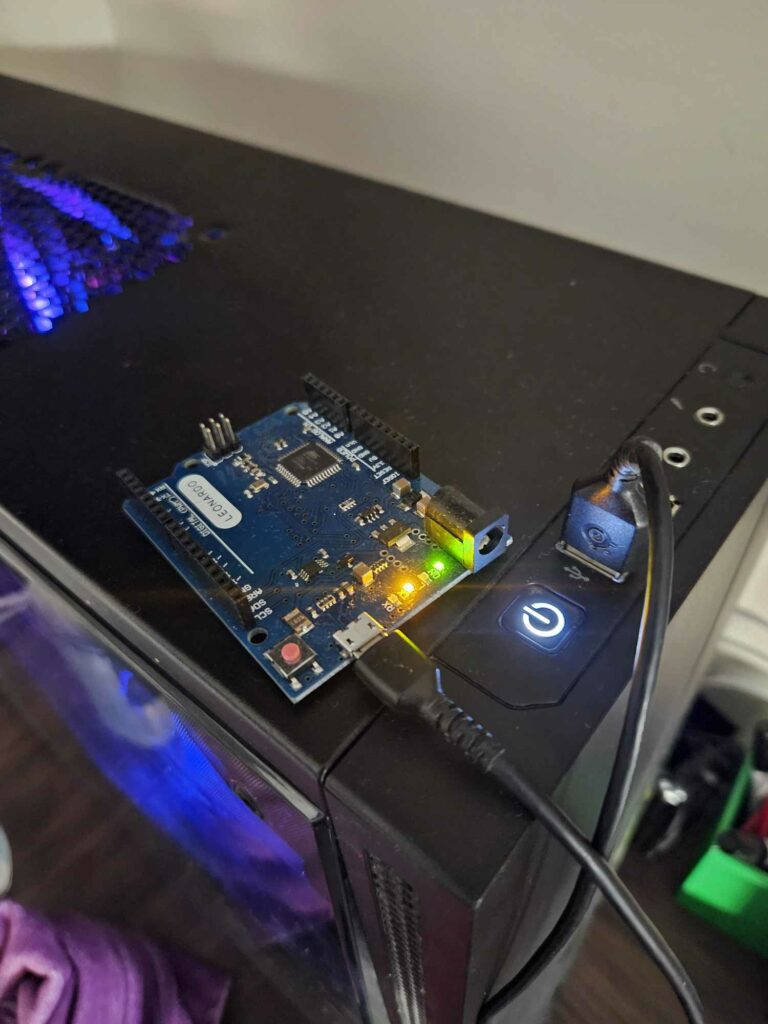
- Connect your Arduino Leonardo: Use a USB cable to connect the Leonardo to your computer.
- Install Drivers (if necessary): Most modern operating systems will automatically install the necessary drivers for the Leonardo. However, if your computer doesn’t recognize the board, you might need to install drivers manually. You can find these drivers on the Arduino website.
- Open Arduino IDE: Launch the Arduino IDE on your computer.
- Select the Board: Go to
Tools > Board, and from the dropdown menu, select “Arduino Leonardo.” - Choose the Port: Go to
Tools > Portand select the port that corresponds to your Arduino Leonardo. The correct port should be labeled with the Arduino board’s name. - Upload a Test Sketch: Open a basic sketch to test the functionality of your board. For example, try uploading the “Blink” sketch which blinks an LED on the board.
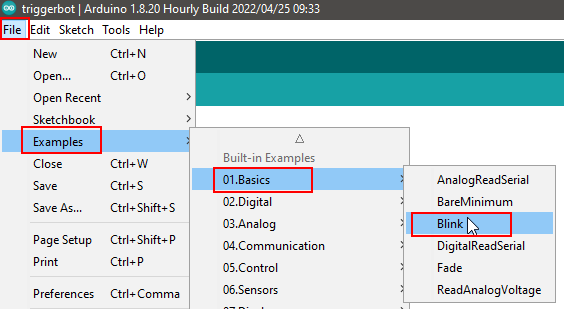
- Go to
File > Examples > 01.Basics > Blink.- Review the code, if needed.
- Click the right arrow icon (Upload) in the Arduino IDE to compile and upload the sketch to your Leonardo.

- Verify Connection: If everything is set up correctly, you should see the onboard LED blinking. If not, double-check the connections and selected settings.
If the test sketch works without issues repeat the same steps but instead of the code for Blink, create a new sketch with the same settings and paste the code mentioned in Arduino IDE code. Then run the python code while using aimlab!
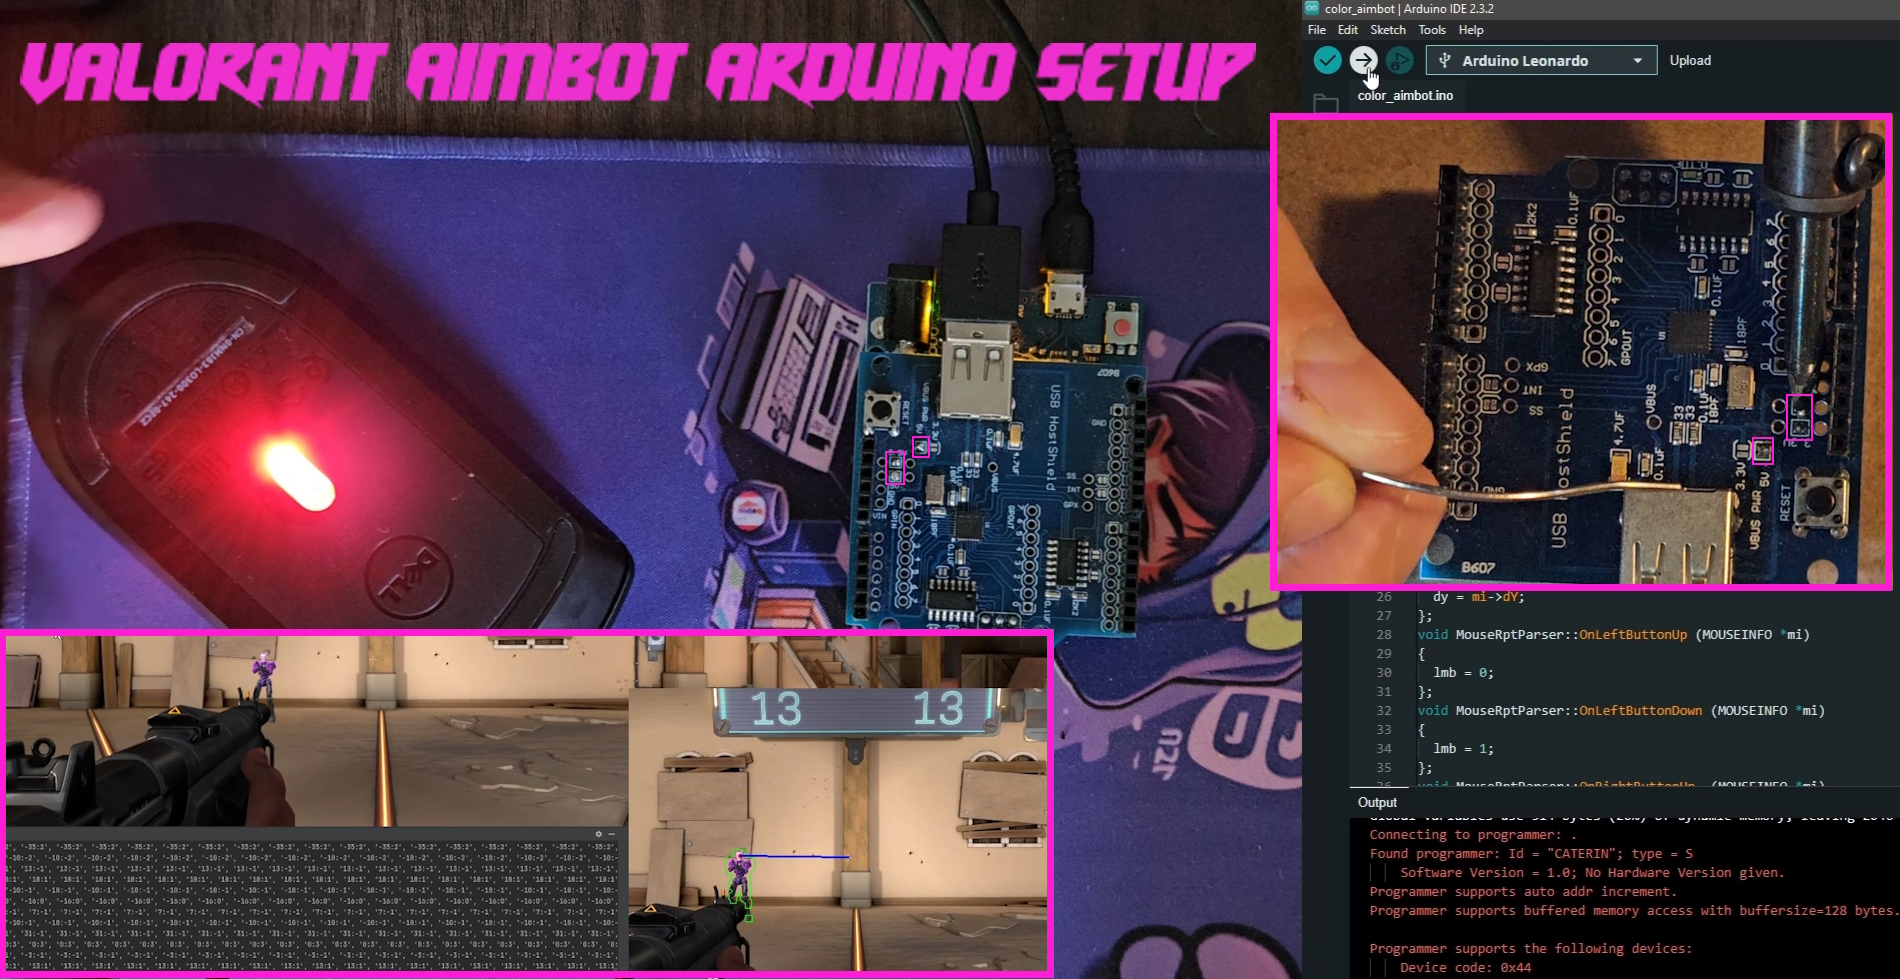
This video shows the whole process and goes into visual details of the project:
Peeking into the Future: Valorant Triggerbot Sneak Peek
Additionally, a glimpse into the future reveals the exploration of Triggerbot functionalities in Valorant using similar techniques showcased earlier. This sneak peek hints at further advancements in gaming automation, teasing the potential for enhanced gameplay experiences.
Conclusion: Unlocking the Future of Gaming Automation
In conclusion, the amalgamation of Arduino Leonardo and advanced coding techniques reshapes gaming automation paradigms. The optimization of scripts, integration of hardware-based mouse clicks, and the promise of Triggerbot functionalities signal a promising future for gamers seeking precision and efficiency in gaming.
For more in-depth tutorials and upcoming developments, click on the banner below, subscribe to the channel and stay tuned for future gaming automation innovations.
Check out the aimbot in valorant using these methods! https://www.slyautomation.com/blog/valorant-aimbot-with-color-detection-with-python/


3 thoughts on “Arduino IDE: Aimbot in AimLab Using Arduino Leonardo”