


Here’s the Valorant aimbot tutorial!Look no further, in this comprehensive guide, we’ll delve into an advanced aimbot script designed to elevate your gameplay to the next level using python, arduino and color detection. Our focus today is on optimizing your aiming precision with a Valorant aimbot.
Github Source: https://github.com/slyautomation/valorant_aimbot
Understanding the Aimbot Script
The aimbot script we’re discussing builds upon the concept of aim lamps, integrating it seamlessly into the popular first-person shooter, Valorant. By leveraging a hue of outline color, this script detects enemy structures, providing visual cues to improve your targeting accuracy.
Key Components of the valorant aimbot Script:
- Imports and Setup:
- Math, threading, time, numpy, OpenCV, keyboard, serial, and Win32con libraries are imported.
- Initialization of necessary variables and functions.
- Configuration and Calibration:
- Fine-tuning parameters such as num steps, FOV, and FPS.
- Adjusting screen resolution and setting up necessary modules.
- Detection and Processing:
- Utilizing HSV color spectrum thresholds for precise object detection.
- Implementing image processing techniques to filter and isolate target objects.
- Execution and Visualization:
- Integrating mouse actions based on detected coordinates.
- Visual feedback through contours and graphical overlays on the screen.
How Does It Work?
- Color Detection:
- The script identifies target objects based on predefined color thresholds.
- HSV color space is preferred for its effectiveness in color range definition.
- Coordinate Calculation:
- Precise calculation of target coordinates using mathematical algorithms.
- Incorporating adjustments for smoother cursor movement.
- Action Execution:
- Triggering mouse actions based on detected coordinates and user inputs.
- Ensuring seamless integration with the game environment.
The valorant aimbot code
Let’s break down the code step by step:
- Import necessary libraries:
import math
import threading
import time

import numpy as np
import cv2
import keyboard
import serial
import win32api, win32con
from PIL import Image, ImageGrab
import scipy
from mss import mss

import PyArduinoBot_v2
from PyArduinoBot_v2 import arduino_mouse- Set screen resolution and initialize PyArduinoBot_v2 parameters:
- scalex and scaley not used
scalex = win32api.GetSystemMetrics(win32con.SM_CXSCREEN)
scaley = win32api.GetSystemMetrics(win32con.SM_CYSCREEN)
PyArduinoBot_v2.num_steps = 5
PyArduinoBot_v2.FOV = 1
PyArduinoBot_v2.FPS = True- Define upper and lower color thresholds for valorant aimbot color detection:
lpoint = [135, 35, 20]
upoint = [155, 255, 255]- Define monitor dimensions for screenshot capture:
monitor = {"top": 0, "left": 0, "width": 1920, "height": 1080}
sct = mss()- Define screen center point:
pt = (960, 538)- Define functions for screenshot capture, FOV adjustment, script termination, mouse action, and color detection.
def sct_screenshot()
def sct_screenshot():
    global sct
    try:
        img = np.array(sct.grab(monitor))
        return img
    except:
        sct = mss()
return print("error with image")- Global Variable Declaration: The function starts by declaring the
sctvariable as global. This means that the function can access and modify thesctvariable defined outside its scope. - Screenshot Capture: Inside a
tryblock, the function attempts to capture a screenshot using thesct.grab()method from themssmodule. Themonitorvariable specifies the dimensions of the area to capture. Thegrab()method returns anImageobject. - Convert to Numpy Array: The captured image is converted into a NumPy array using
np.array()for easier manipulation and processing. - Return Image: The function returns the NumPy array representing the screenshot image.
- Exception Handling: If an exception occurs during the screenshot capture (e.g., due to a monitor resolution change), the function catches the exception and reinitializes the
sctobject usingmss()to ensure the next capture attempt is successful. It then prints an error message.
In summary, sct_screenshot() is a function that captures a screenshot of the specified monitor area using the mss module, converts it into a NumPy array, and handles any exceptions that may occur during the capture process.
Def close_script()
- Global Variable Declaration: The function starts by declaring the
botvariable as global. This allows the function to access and modify thebotvariable defined outside its scope. - Setting Bot Flag: It sets the
botvariable toTrue, indicating that the script is running. - While Loop: The function enters a
whileloop that continues as long as thebotvariable isTrue. This loop continuously checks for a termination condition.
def close_script():
    global bot
    bot = True
while bot:- Keyboard Input Check: Inside the loop, it checks if the Caps Lock key is pressed using the
keyboard.is_pressed()function. If Caps Lock is pressed, it setsbottoFalse, indicating that the script should terminate. - Termination Actions: If Caps Lock is pressed, it prints a message indicating that the script is shutting down and then calls the
exit()function to terminate the script.
        if keyboard.is_pressed('capslock'):
            bot = False
            print("Color bot shutting down!")
exit()Sleep: Between iterations of the loop, it pauses execution for 1 second using time.sleep(1). This ensures that the loop doesn’t consume excessive CPU resources while waiting for keyboard input.
time.sleep(1)In summary, close_script() is a function that continuously checks for the Caps Lock key to be pressed. If Caps Lock is detected, it sets a flag (bot) to indicate that the script should terminate and then exits the script. This function allows for graceful termination of the script based on keyboard input.
Def detect_color()
Lets look into the detect_color() function for the valorant aimbot:
def detect_color():
    global bot, pt
    bot = True
    while bot:
Global Variable Declaration
The function starts by declaring the bot and pt variables as global. This allows the function to access and modify these variables defined outside its scope. Setting Bot Flag: It sets the bot variable to True, indicating that the color detection process is active. While Loop: The function enters a while loop that continues as long as the bot variable is True. This loop continuously performs the color detection process.
Screenshot Capture: Inside the loop, it captures a screenshot of the monitor area using the sct_screenshot() function. It then creates a copy of the captured image to perform manipulations (img = image).
        image = sct_screenshot()
        img = image
        ...
Define Close Points List: It initializes an empty list called close_points to store the coordinates of points that are close to the detected contours.
# define the list of boundaries
close_points = []
# loop over the boundaries
Convert Image to HSV: It converts the color space of the captured image from BGR (Blue, Green, Red) to HSV (Hue, Saturation, Value). This conversion simplifies color range detection.
image = cv2.cvtColor(image, cv2.COLOR_BGR2HSV)Define Color Range: It defines the lower and upper bounds of the HSV color range to be detected using the lpoint and upoint arrays, respectively.
# Define the lower and upper HSV values for the color range you want to detect
lower = np.array(lpoint, dtype="uint8")
upper = np.array(upoint, dtype="uint8")
Create Mask: It creates a mask using cv2.inRange() function to identify pixels within the specified color range.
# Create a mask to detect the specified color range
mask = cv2.inRange(image, lower, upper)
Dilate Mask:
It dilates the mask using a 3×3 kernel to fill in any gaps or holes in the detected regions. This is done to ensure more robust contour detection.
 kernel = np.ones((3, 3), np.uint8)
dilated = cv2.dilate(mask, kernel, iterations=4)Thresholding:
It applies a threshold to the dilated mask to obtain a binary image where pixels within the specified color range are white and others are black.
ret, thresh = cv2.threshold(dilated, 40, 255, 0)Find Contours: It finds contours in the thresholded image using cv2.findContours(). Contours are outlines of objects or regions of interest detected in the image.
contours, hierarchy = cv2.findContours(thresh, cv2.RETR_EXTERNAL, cv2.CHAIN_APPROX_NONE)Draw Contours: It draws the detected contours on the original image using cv2.drawContours(). This is done for visualization purposes.
cv2.drawContours(img, contours, -1, (0, 255, 0), 1, cv2.LINE_AA)Iterate Over Contours: It iterates over each contour found.
for c in contours:Calculate Contour Area: It calculates the area of each contour using cv2.contourArea(). Filter Contours: It filters out contours with an area smaller than 200 pixels. This helps remove noise or small objects detected in the image.
if cv2.contourArea(c) > 200:Calculate Closest Points: For each contour passing the area filter, it calculates the center point (x, y) of the contour’s bounding rectangle and adds it to the close_points list. Divide the x width by 2 to get the center and divide the y height by 9 to ensure the upper most area of the object is targeted (for the headshot in valorant).
x1, y1, w1, h1 = cv2.boundingRect(c)
close_points.append((round(x1 + (w1 / 2)), round(y1 + (h1 / 9))))
Find Closest Point to Cursor: It finds the closest point in the close_points list to a predefined point pt, likely representing the cursor position.
if len(contours) != 0:
closest = close_points[scipy.spatial.KDTree(close_points).query(pt)[1]]
Draw Closest Point and Line: It draws a circle around the closest point and a line connecting it to the predefined point pt. This helps visualize the interaction between the cursor and the detected object.
cv2.circle(img, (closest[0], closest[1]), radius=3, color=(0, 0, 255), thickness=-1)
cv2.line(img, pt, (closest[0], closest[1]), (255, 0, 0), 2)
Check for Shift Key Press: It checks if the Shift key is pressed using keyboard.is_pressed("shift").
if keyboard.is_pressed("shift"):
  ...
Perform Mouse Action: If the Shift key is pressed, it likely calls a function named mouse_action() to perform a specific action, such as clicking, at the closest point’s coordinates.
mouse_action(closest[0], closest[1], button='left')Exception Handling:
It wraps the entire block of code within a try-except block to catch any potential errors that may occur during contour detection or mouse action. If an error occurs, it ignores it and continues the loop.
try:
  ...
except:
    pass
Overall, this code segment is responsible for detecting specified colors in the captured image, finding the contours of the detected objects, identifying the closest contour to a predefined point (likely representing the cursor position), and performing an action based on user input (e.g., pressing the Shift key).
Display Image:
It displays the image with detected contours using cv2.imshow() for visualization purposes. The cv2.waitKey(5) function waits for a key press for 5 milliseconds. This allows the image to be displayed and updated continuously.
        cv2.imshow("images", img)
        cv2.waitKey(5)
Function Invocation:
Finally, the function is invoked when the script is run as the main program. It initiates the color detection process.
# Press the green button in the gutter to run the script.
if __name__ == '__main__':
    ...
    detect_color()  # valorant aimbot :)
    ...
In summary, detect_color() is a function that continuously captures screenshots, detects specified colors, identifies contours, and displays the processed image. It runs in a loop until a termination condition (bot variable becoming False) is met.
Initialize serial communication with Arduino and start threading for script termination and color detection:
if __name__ == ‘__main__’:
This part of the code is a common pattern used in Python scripts. Let’s break it down:
if __name__ == '__main__':This line checks if the script is being run as the main program. In Python, when a script is executed, the special variable __name__ is set to '__main__' only if the script is being executed directly, not if it is imported as a module into another script.
    global arduino
    port = 'COM5'
    baudrate = 115200
    arduino = serial.Serial(port=port, baudrate=baudrate, timeout=.1)
Here, it initializes a global variable arduino as an instance of the Serial class from the serial module. It sets the port to ‘COM5’ and the baudrate to 115200 for serial communication with some external device, presumably an Arduino board.
print("Starting aimbot!!!")This line simply prints a message indicating that the aimbot is starting.
threading.Thread(target=close_script).start()This line creates a new thread that will execute the close_script function. This function likely contains a loop that continuously checks for a specific keyboard input to terminate the script. Starting it in a separate thread allows the script to perform other tasks concurrently while waiting for the termination condition.
print("Aimbot On!!!")This line prints a message indicating that the aimbot is now active.
detect_color() # valorant purple outlineThis line calls the detect_color function, which presumably contains the main logic for detecting and interacting with colors on the screen.
print("done!!")Finally, this line prints a message indicating that the script has finished its execution.
In summary, this part of the code initializes serial communication, starts a separate thread for handling script termination, activates the aimbot, executes the color detection logic, and prints status messages throughout the process.
This script essentially captures screenshots, detects a specified color range in the screenshot, identifies the closest point to a predefined center point, and performs mouse actions based on keyboard input while continuously running in a separate thread until terminated.
Limitations and Considerations
While the aimbot script offers significant advantages in aiming accuracy, it’s essential to be aware of its limitations:
- Color Spectrum Interference: Objects with similar color spectrums may interfere with target detection.
- Accuracy Trade-offs: Fine-tuning parameters may impact script accuracy, especially with decimal-to-integer conversions.
- Detection Sensitivity: Sensitivity to environmental changes may affect script performance.
Practical Demonstration
To provide a hands-on understanding, we’ve included a demonstration of the aimbot script in action. While the script enhances aiming precision, it’s crucial to exercise caution and discretion, especially in competitive environments.
Conclusion
Mastering aiming skills in Valorant is a journey that requires dedication and practice. With the advanced aimbot script discussed in this guide, you’ll have a valuable tool to sharpen your aiming prowess. Remember, while technology can aid your progress, nothing beats the combination of skill, strategy, and sportsmanship in competitive gaming.
Stay tuned for our upcoming guides, where we’ll explore additional enhancements, including triggerbot functionality. Don’t forget to like, subscribe, and share your thoughts in the comments. Until next time, happy gaming!
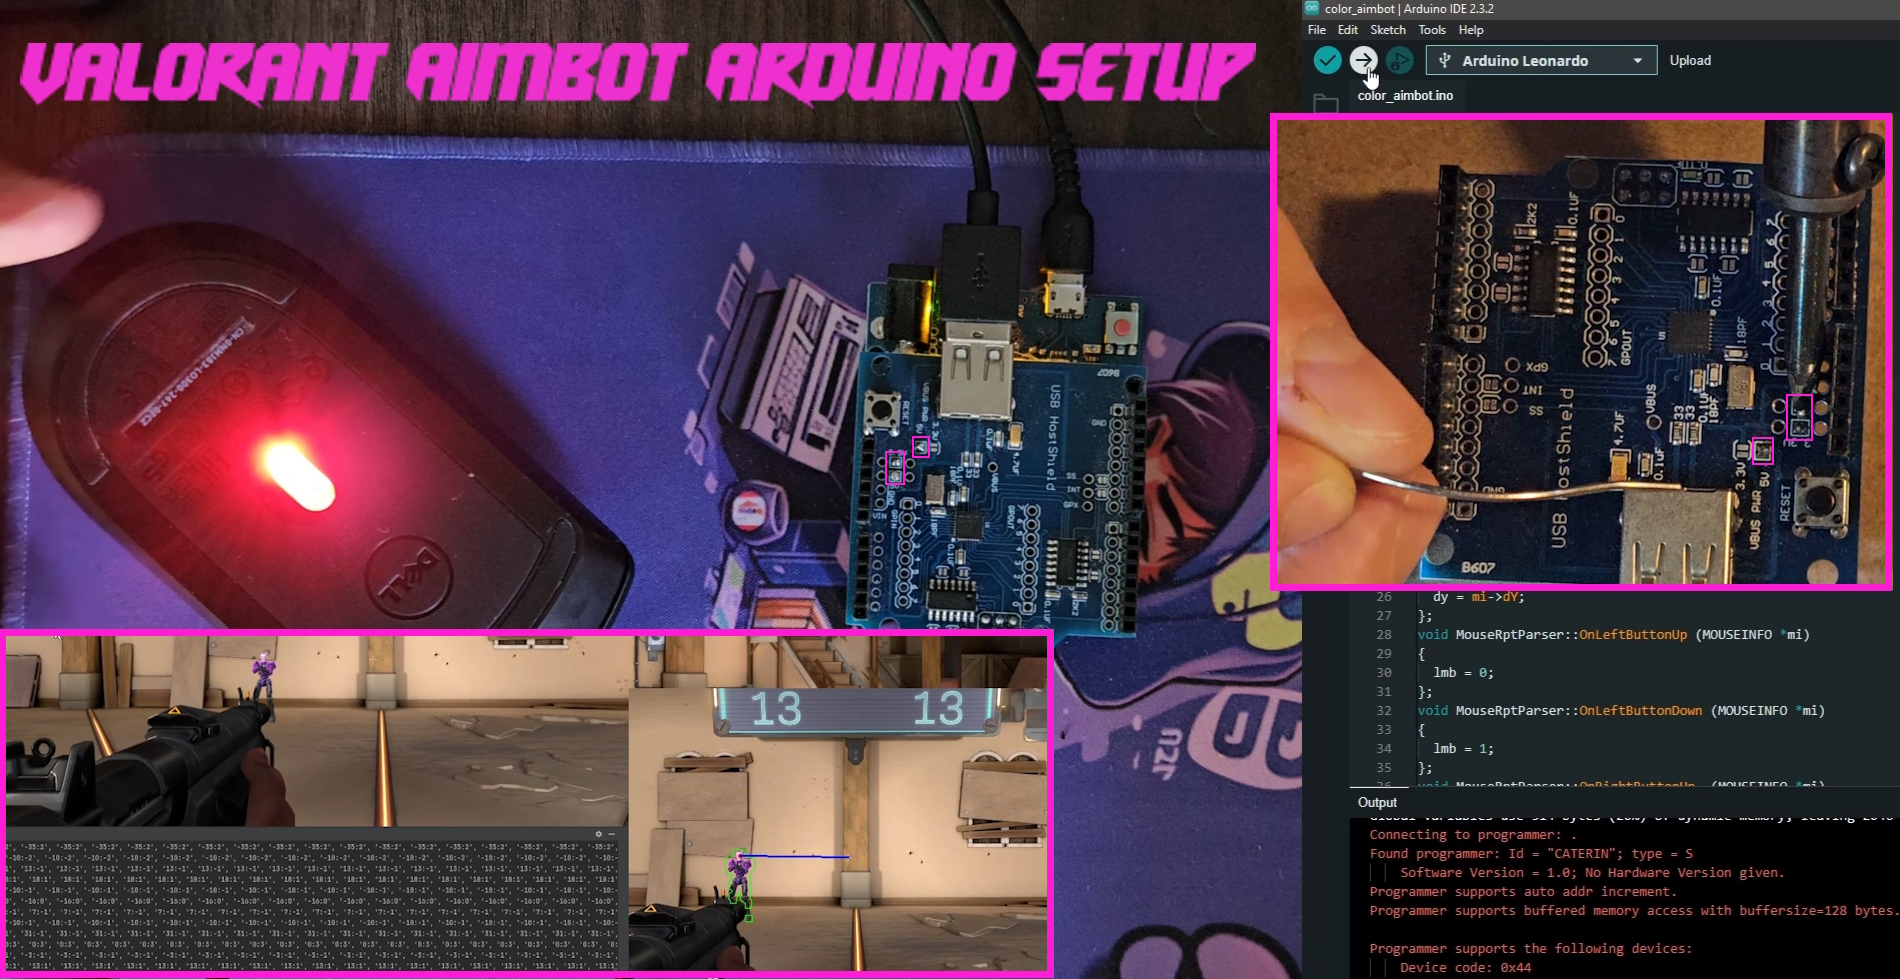
Need help with the arduino side? see the youtube on the valorant aimbot arduino setup!

The best contribution of all, you are the best, I wanted to ask how can I make it work with a Razer mouse because with mine only the clicks work but I can’t move the cursor?
use this file which im hoping resolves mouses with other input variables to accomodate for: https://github.com/slyautomation/valorant_aimbot/blob/main/razar_logitech_other_mouse.ino
I added your idea to my code, but there are a couple of problems with it, one is that it aims between two people when they are closer together, and the second is that the wobbling is a bit drastic, so how should I fix that.
Very good tutorial.
I have a question. How to separate auto-aim from auto-fire. For example, when I hold shift, he only moves the crosshair to the character’s head, and when I press the right mouse button, he starts firing.